
Let’s face it, we’ve got a lotttt of time on our hands. So let’s bake some cookies from scratch shall we? For anyone reading along who’s thinking “Ooooh I’m no cake boss” this was my first time making any cookie from scratch too. I grew up with break and bake and never thought anything of it until, well, #quarantine. So, if I can do this, you can do this, I promise.
After some heavy Youtube research, I’ve realized that in order to get your perfect cookie you have to decide on three things, butter, sugar, and for lack of a better term, wait time. Let me elaborate:
- Butter – The fat that holds the cookie together and also adds flavor. There are a million and one cookie recipes out there using everything from aqua faba, to coconut oil, to ghee, but for those who are cool with butter, use it. A lot of recipes say cold butter is fine, but if you’re like me and don’t have a stand mixer, or even hand mixer, melt the butter. No, brown the butter. Browning the butter adds extra flavor and allows you easily mix your dough without a body builder’s arm. All you need is a whisk baby.
- Sugar – This one oddly has a lot to do with the chew and texture of your cookie. If you’re cool with flat (I am not) then one type of sugar is fine. Please god don’t use white sugar, at least go organic cane. But if you want a cookie thats crispy on the outside and chewy in the middle, you’re gonna have to mix it up! I went with organic cane and light brown sugar. If you want that extra color and chew go dark brown sugar.
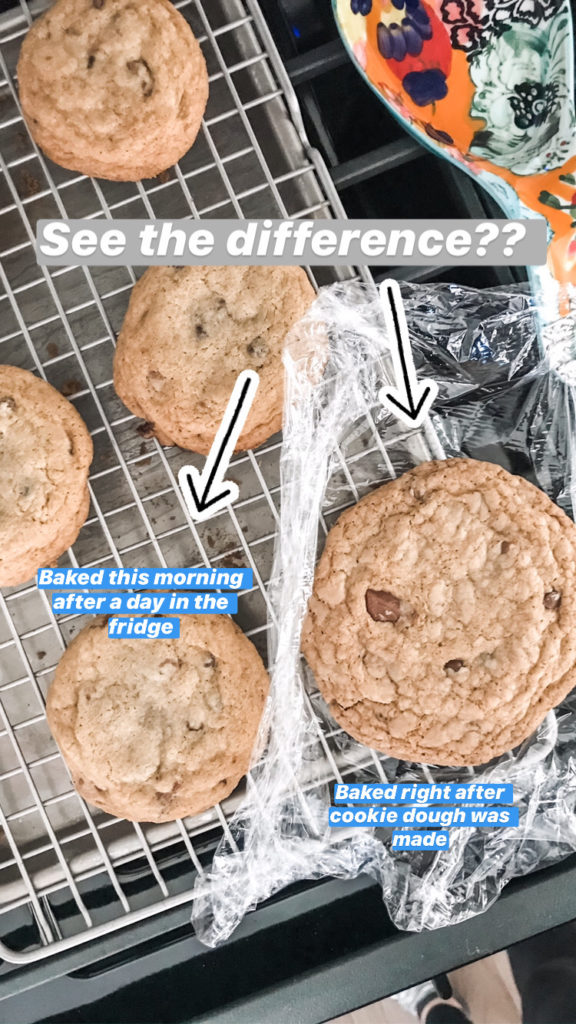
- Last but not least, but surprisingly the most important, wait time. I experimented with my dough by baking off one cookie right after I mixed it all together. The result? A lose dough that was hard to form into a ball (waiting for your browned butter to cool can also prevent a lose dough but I am not a patient woman) and a flat, oddly crispy cookie. This cookie dried out immediately and almost felt like it was less flavorful than the dough? How, I do not know, but after one I said “FINE” and I threw my dough into the fridge overnight. The next day the results were astonishing.
Ingredients – Dry
- 1 3/4 cup flour (I used Bob’s cup for cup gluten free baking flour, but you do you)
- 2 Tsp kosher salt
- 1 Tsp baking soda (can add more for added fluff)
- 1-2 bars of preferred chocolate (I know some of you guys like milk but trust me, this batter is savory enough to need a strong semi-sweet or dark chocolate chunk)
Ingredients – Wet
- 1 cup browned butter (cool in a glass measuring cup, add water to fill to cup line since butter will have lost a little volume in the melting process)
- 1/2 cup organic cane sugar
- 1 cup light OR dark brown sugar (darker = chewier)
- 2 Tsp Vanilla (I did bourbon vanilla)
- 1 whole egg + 1 egg yolk
Directions – Make & Bake
- Whisk the flour, salt and baking soda in a bowl. Set aside.
- In a separate bowl whisk your browned butter, sugar and vanilla together. Browned butter should be COOL. Make that first and let it cool off while you get everything else together. Add in your whole egg + egg yolk and whisk until combined.
- Pour your flour mixture into the wet mixture in thirds and whisk to combine. You can’t really over mix but don’t worry about a little flour hanging around when you’re done, that will get whipped into place when you add in your chocolate.
- Take your chocolate bars and chop them on a diagonal with a serrated knife. Rotate and chop again until you have a bunch of uneven chunks. (We do this so that the chocolate shreds get all in that cookie dough and make these cookies TOO damn good)
- Pour your chocolate chunks into the batter and stir in with a spatula. Don’t whisk at this point, trust me.
- Now this is the part where we fight every urge in our body to bake these cookies right away. Take a deep breath and put your cookie dough into the fridge. If you can make it an hour, you’re golden. If you can make it even longer – it will be worth it. Chilling your cookie dough will allow the flavors to settle, flour to rehydrate, and your cookies to have that fluff and chew you crave! If you must see the difference for yourself, feel free to bake one cookie right away and compare to the chilled dough later on. You will be shocked and amazed at what happens.
- After chilling your dough, scoop it onto a baking sheet (grease with butter or put down some parchment paper) and bake at 350 degrees for 12-14 minutes. I did 13 minutes and found that to be perfect. If you can pre-scoop your dough onto a tray before chilling, that will be a lot easier than having to scoop chilly dough. My dough was a little too runny to do so, but other flours might have more hold.
8. After 12-14 minutes, remove your cookies and place onto a cooling rack. Let them sit for at least 10 minutes before serving. The inside will be chewy and melty, the outside nice and crispy.
9. Pour some milk/tea/coffee/wine, break open a puzzle and enjoy!
If you make these cookies, PLEASE tag me on the ‘gram @lifesabeacham with the hashtag #nomnomnom and tell me how long you chilled your dough for!